
How to Change Car Air Filter: Step-by-Step Guide for Every Car Owner
- Cars
- 18 Jun, 2026

Most car owners know they should change the engine oil. Far fewer pay attention to the air filter — and that's a costly oversight. Your engine needs air just as much as it needs fuel. In fact, for every litre of fuel your engine burns, it consumes roughly 10,000 litres of air. Every cubic centimetre of that air passes through your air filter first.
A dirty, clogged air filter starves your engine of oxygen. The result: sluggish acceleration, reduced fuel efficiency, and over time, real engine damage. According to the U.S. Department of Energy, replacing a clogged air filter on older carbureted vehicles can improve fuel economy by as much as 14%. On modern fuel-injected cars, a dirty filter directly triggers the engine control unit (ECU) to run a richer fuel mixture — burning more petrol to compensate for less air.
The good news? This is one of the simplest, most affordable car maintenance tasks any person can do at home — no ramps, no grease, no mechanical training required.
What Does a Car Air Filter Actually Do?
The engine air filter sits inside a plastic housing — called the airbox — and its one job is to trap dust, pollen, insects, sand, and debris before they enter the engine. Without it, abrasive particles would score your cylinder walls, damage pistons, and contaminate your engine oil at a dramatically accelerated rate.
Most factory-fitted air filters are made from pleated paper or cotton gauze, shaped into a rectangular panel or a circular/cylindrical cartridge. They're inexpensive components doing an exceptionally important job.
How Often Should You Change It?
There is no single universal answer — it depends on where and how you drive. Here are the general guidelines used by most major manufacturers and service advisors:
Standard recommendation: Every 15,000 to 30,000 km (roughly 10,000 to 20,000 miles), or once a year — whichever comes first.
Change it sooner if you regularly drive in:
- Dusty environments (dirt roads, construction zones, rural areas)
- High-pollution urban traffic
- Desert or sandy conditions
- Areas with heavy pollen seasons
Real-world truth: Many mechanics and experienced drivers replace theirs every 12,000 km simply because the filter is so cheap (₹200–₹800 for most Indian cars; $10–$25 in Western markets) that there's no reason to push it. The cost of a new filter is trivially small compared to the cost of a fuel injector cleaning or engine repair.
A practical rule: Check it every time you get an oil change. Hold it up to sunlight. If it looks grey, brown, or black — replace it.
What You'll Need
This is genuinely a tool-light job. Here's everything:
- A new air filter (the correct one for your car's make, model, and year — more on this below)
- A clean rag or paper towels
- Optionally: a flat-head screwdriver (for some older airbox clamps)
- Optionally: a Phillips-head screwdriver or 8mm socket wrench (for some vehicles with screwed-down lids)
That's it. No jacks. No lifts. No oil-stained overalls required.
Step 1 — Buy the Right Filter Before You Start
This is the step most people skip, and it causes unnecessary trips back to the store. Air filters are not universal. A filter for a Maruti Swift is different from one for a Honda City or a Hyundai Creta.
How to find your correct filter:
- Check your owner's manual. It will list the part number and replacement interval. This is the most reliable source.
- Use the filter brand's fitment guide. Brands like K&N, Bosch, Mann Filter, and Purolator all have online lookup tools where you enter your car's year, make, model, and engine size.
- Take the old filter to the shop. If you're already doing the job, bring the dirty one to the auto parts store and match it physically.
- Ask at the dealership parts counter. Give them your Vehicle Identification Number (VIN) — usually on the dashboard near the windshield or inside the driver's door jamb — and they can pull the exact part.
Filter choices: The standard paper filter is perfectly adequate and the most affordable option. High-performance oiled cotton gauze filters (like K&N) are reusable and can be cleaned and re-oiled every 50,000–80,000 km, but they cost significantly more upfront. For most everyday drivers, the standard OEM-equivalent paper filter is the right call.
Step 2 — Let the Engine Cool Down
If you've just driven the car, wait at least 15–20 minutes before opening the bonnet. The airbox itself won't be extremely hot, but components nearby can be. More importantly, working with a cool engine means no accidental burns and no thermal expansion issues when you're handling parts.
Park on a flat, level surface and apply the handbrake.
Step 3 — Open the Bonnet and Find the Airbox
Pop the bonnet (hood) using the release lever — usually located under the dashboard on the driver's side — and then release the secondary safety catch at the front of the bonnet.
Now look into the engine bay. The airbox is that large plastic box, usually black, connected to a thick corrugated rubber or plastic tube (the intake duct) that leads toward the engine. On most modern cars it sits prominently near the front corner of the engine bay — on the left or right depending on the vehicle.
On common Indian cars:
- Maruti Suzuki Swift/Dzire/Baleno: Airbox is on the right side of the engine bay, near the battery
- Hyundai i20/Creta: Typically front-left corner
- Honda City/Amaze: Front-right side
- Tata Nexon/Punch: Front-left with a prominent intake snorkel
If you're uncertain, follow the thick rubber tube from near the front grille toward the engine — it will lead you directly to the airbox.
Step 4 — Open the Airbox
This is the step that varies most between vehicles, but it's never complicated. There are three common airbox closure types:
Type 1 — Metal spring clips (most common): Four to six metal clips hold the lid down. Pinch each one and flip it outward. No tools needed. These are designed for tool-free access.
Type 2 — Plastic wing nuts or thumb screws: Simply unscrew them by hand.
Type 3 — Phillips or flat-head screws: Use the appropriate screwdriver. Usually two to four screws around the perimeter of the lid.
Once unclipped or unscrewed, lift the lid of the airbox. It may hinge open or come off completely. On some vehicles there's a rubber intake hose clamp you'll need to loosen slightly first — if the hose feels attached to the lid, use a flat-head screwdriver to loosen the hose clamp just enough to free it.
Important: Don't disconnect the Mass Airflow Sensor (MAF sensor) wire that may be clipped to the airbox cover. It's a small electrical connector. You don't need to unplug it for this job — just let the lid hang or set it gently aside without yanking any wires.
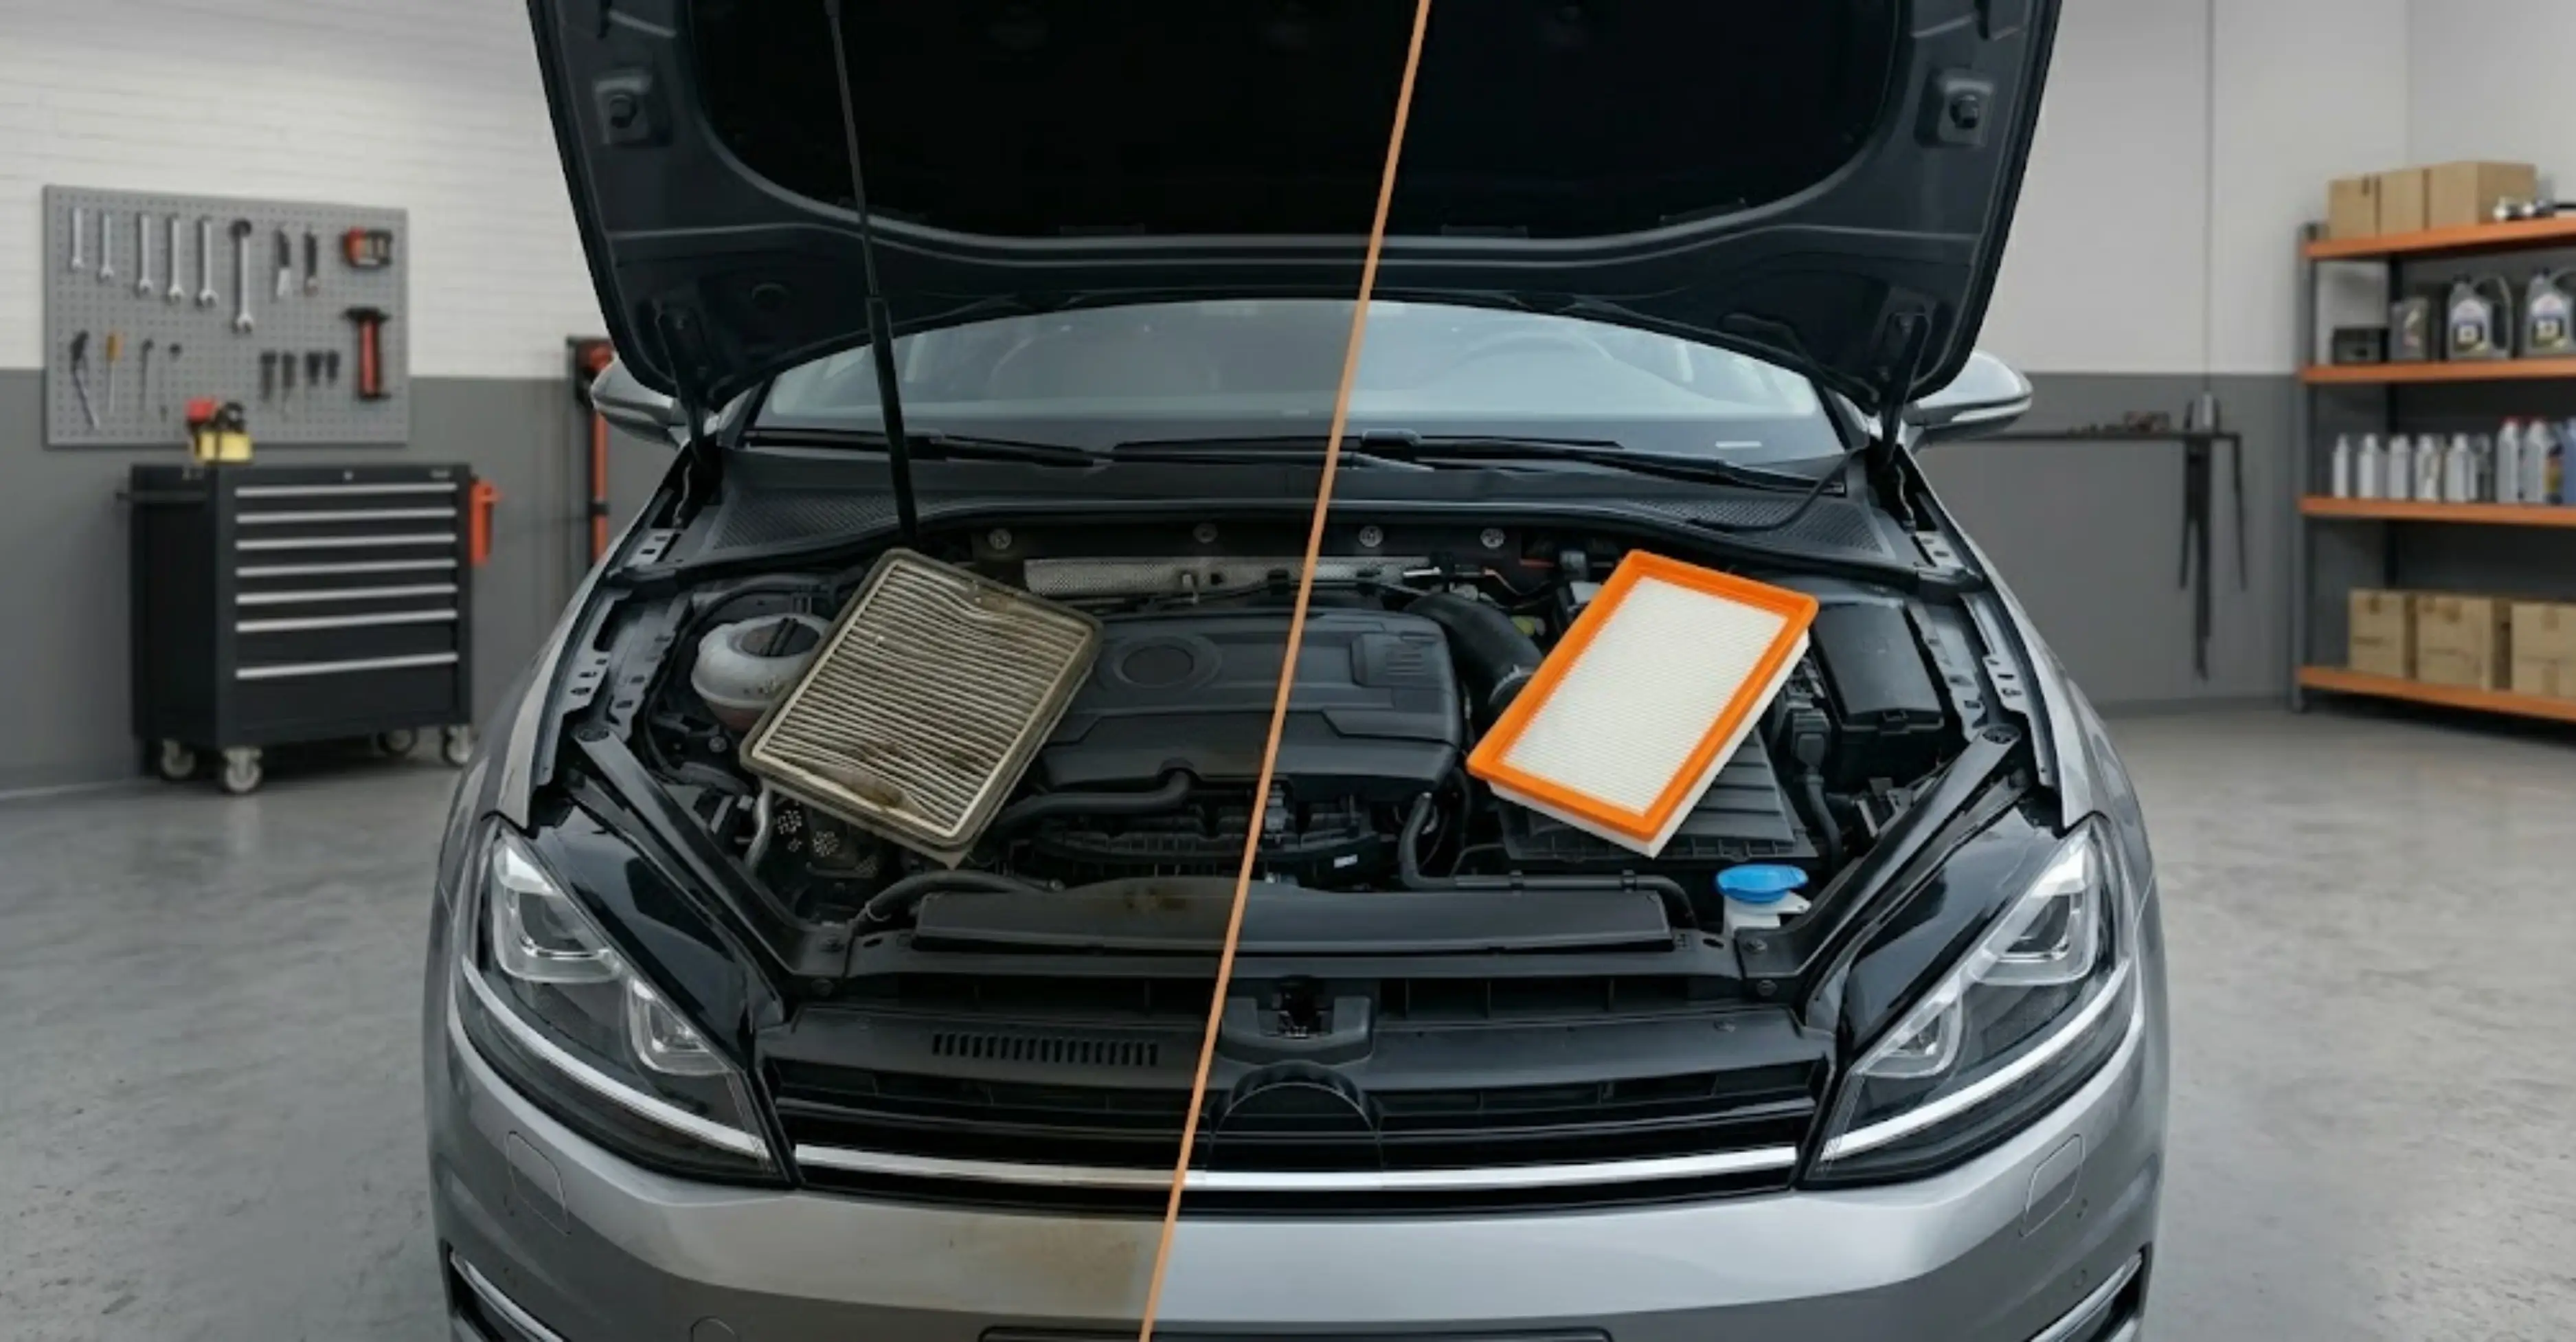
Step 5 — Remove the Old Filter
With the lid open, the filter is sitting right there. Lift it straight out. Note which way it sits — there's usually only one correct orientation (the rubber gasket or sealing edge faces a specific direction), but it's good practice to note it before discarding the old one.
Inspect the old filter: Hold it up to a light source (the sun works perfectly). If you can see light evenly through the pleats, it may still have some life. If it's caked with grey or black dust, visibly deformed, torn, or if the pleats are matted together — it's overdue for replacement.
Step 6 — Clean the Airbox Interior
Before installing the new filter, take 30 seconds to wipe out the inside of the airbox with a dry rag or paper towel. Remove any loose debris, dead insects, leaves, or accumulated dust. Don't use water or cleaning sprays inside the airbox — just a dry wipe is sufficient and safe.
Check the rubber gasket or sealing lip around the airbox. It should be soft and pliable, not cracked or brittle. If the seal is deteriorated, air (and debris) can bypass the filter entirely.
Step 7 — Install the New Filter
Drop the new filter in. It should seat snugly inside the airbox without forcing. Most filters have a slightly thicker rubber or foam edge on one side — this is the sealing edge and it should face outward, pressing against the airbox lip when the lid closes.
Make sure the filter lies flat, fills the entire opening, and has no folded corners or gaps around the edges. A poorly seated filter is almost as bad as no filter.
Step 8 — Close and Secure the Airbox Lid
Replace the lid exactly as it came off. Reattach any intake hose you may have loosened. Clip the spring clips back, retighten the thumb screws, or replace the screws. Give each fastener a check to confirm the lid is fully seated and there are no gaps.
This matters: if the lid isn't properly sealed, unfiltered air can be drawn in around the edges, defeating the entire purpose of the filter.
Step 9 — Start the Engine and Check
Close the bonnet, start the engine, and let it idle for a minute. Listen for any unusual sounds — there should be none. If you hear a whistle or hissing, it may indicate the lid isn't fully closed or a hose connection is loose. Turn off the engine, recheck, and reseat everything.
On some modern cars with sensitive MAF sensors, the ECU may take a short drive cycle (5–10 minutes of normal driving) to recalibrate air-fuel mixture parameters after a filter change. This is completely normal.
How to Tell Your Air Filter Needs Changing (Without Opening the Bonnet)
You don't always need to physically inspect the filter to know it's time. Here are the symptoms your car will show:
Reduced fuel efficiency. If you're filling up more often without driving more, a clogged filter is a prime suspect. The ECU compensates for lower airflow by injecting more fuel.
Sluggish acceleration. A lean air supply means the engine can't combust fuel efficiently. The car feels heavy, reluctant to pick up speed, or hesitates when you press the accelerator.
Engine misfires or rough idling. A severely restricted filter disrupts the precise air-fuel ratio needed for smooth combustion.
Black smoke from the exhaust. This is a sign of a rich-running engine — too much fuel, not enough air — which can result from a very blocked filter.
The "Check Engine" light. On modern cars, the ECU monitors airflow data from the MAF sensor. If airflow drops below expected parameters, it can trigger an engine warning code (typically P0171 or P0174 — lean fuel mixture codes).
A visible dirty filter. The most direct check. Grey is borderline; brown or black means replace immediately.
Common Mistakes to Avoid
Buying the wrong filter. Always verify the part number. A filter that's 2mm too small will leave gaps; one that's too large won't fit at all.
Installing it backwards. Some filters are directional. Check the old one or the new filter's packaging for orientation markings.
Not sealing the airbox properly. The lid must close flush with no gaps. Run your fingers around the edge after closing to feel for any lifted sections.
Forgetting to check the intake hose. If the corrugated rubber intake tube has cracks, holes, or loose clamps, unfiltered air enters downstream of the filter. While changing the filter, do a quick visual inspection of the entire intake path.
Overbying an expensive filter unnecessarily. High-flow performance filters like K&N make a noticeable difference on performance-tuned engines. On a standard commuter car, the improvement is marginal. A quality OEM-spec paper filter from Bosch, Mann, or the vehicle manufacturer's genuine parts is all most drivers will ever need.
Skipping the interior wipe. Installing a fresh filter into a debris-filled airbox puts the new filter immediately at a disadvantage.
Cost Reality Check
Here's what the job actually costs when you do it yourself versus at a service centre:
| DIY | Service Centre | |
| Filter cost | ₹200 – ₹800 | ₹200 – ₹800 |
| Labour | ₹0 | ₹200 – ₹600 |
| Time | 10 minutes | 30–60 min wait |
| Total | ₹200 – ₹800 | ₹400 – ₹1,400 |
In Western markets, a shop typically charges $50–$100 for a job that takes a technician six minutes. The part itself costs $10–$25. The math on doing it yourself is simple.
A Note on Cabin Air Filters
While you're thinking about air filtration, it's worth knowing your car likely has a second filter: the cabin air filter (also called the pollen filter or AC filter). This filters the air coming into your car's interior through the HVAC system. It lives behind the glove box or under the dashboard on most modern vehicles and should be replaced every 15,000–25,000 km.
Replacing it is equally straightforward and is a separate job from the engine air filter. A clogged cabin filter reduces AC cooling efficiency, causes musty smells inside the car, and can aggravate respiratory issues for passengers. Both filters are worth changing on the same schedule.
Quick Reference Summary
| 1 | Buy the correct filter for your make, model & year |
| 2 | Let engine cool, park on flat ground |
| 3 | Open bonnet, locate the airbox (large plastic box with intake tube) |
| 4 | Unclip or unscrew the airbox lid |
| 5 | Lift out the old filter |
| 6 | Wipe the inside of the airbox clean with a dry rag |
| 7 | Drop in the new filter, sealing edge facing outward |
| 8 | Close and fasten the lid securely |
| 9 | Start the engine, listen for any air leaks |
Final Thought
Changing your car's air filter is the kind of task that makes you feel competent and saves you real money — not once, but every time you do it for the rest of your car-owning life. It requires no experience, no special tools, and no confidence in mechanical work. It requires only the willingness to open the bonnet and spend ten minutes paying attention to your car.
Your engine breathes through that filter every single kilometre. Give it clean air, and it will reward you with better mileage, smoother power, and a longer life.
R. Rajeshwaran
Automobile Analyst
R. Rajeshwaran is an Automobile Analyst with 6+ years of experience, offering expert insights into the latest trends, reviews, and analysis in the automotive industry.
Popular Brands


Latest Car News

How to Stop Your Car from Fogging Up: Science-Backed Tips & Solutions

Tata Cars Under 5 Lakhs in India: Price, Features & Complete Guide

Best Tata 7 Seater Car for Families: Price, Features & Buyer's Guide

Tata Harrier EV Offers of June 2026: Discounts, Exchange Bonus & More

Audi Car Offers of June 2026: Discounts, Exchange Bonus & Finance Deals
Will Existing Cars Need Engine Changes for Flex Fuel? Complete Guide
How to Protect Your Car from Heat This Summer | Practical Car Care Tips

5 Cheapest SUVs in India 2026 – Prices, Specs & Honest Verdict

5 Reasons Why the Nissan Tekton Could Be Worth Waiting For

This ₹6.85 Lakh Car Is Selling Like Crazy – Here’s Why in 2026